Majestic 40 at Gardener's Ridge

building a Wisdom Majestic in North Kellyville


Leave a comment

13 Week Maintenance Period


It’s hard to believe that we have been in our new home for thirteen weeks already. Our maintenance shakedown period has come to an end and we had to supply Wisdom last week with a list of any issues that had arisen.

I’m pleased to say that the list isn’t very long and there isn’t anything major on it. The only clanger seems to be all our ceiling fans are wired incorrectly. The three speeds are set as:

  1. Super fast
  2. Slow
  3. Fast

So now I am armed with two lists of corrections: The original list of outstanding Practical Completion Inspection (PCI) jobs that weren’t completed before handover and now the maintenance issues.

In an ideal world the PCI list would have been completed in the two weeks after PCI and before handover but with the Christmas shutdown looming that didn’t happen. A few of the jobs were done after we moved in and before Christmas then it went quiet in January and picked up a bit before February. It didn’t help that we were back in the UK for the whole of February for my Niece’s wedding 🙂 . A bit of a shock going from a beautiful Aussie Summer to the British Winter but there were bright days.

UK February 2016 017

Stourhead, Wiltshire


All the tradies were supposed to be booked in for our return but so far most are conspicuous by their absence. Perhaps they will be like buses and all come at once.

So what have we been up to in the house?

The driveway and the man cave.

The driveway:

In my last post I wrote about the driveway that was spray coated that day and how happy I was with the end result. In the photos you could see how beautiful and sunny it was. Fast forward a few hours and the rain came pelting down. Unfortunately the sealant hadn’t fully dried in the saw cuts and the rain got under it and blistered it 😦

They had to come back three times to make it good but thankfully in the end it has all been sorted.

The man cave:

Actually it has been hubby that has been hard at work sorting the garage out over the last two weekends. So after a few trips to Masters and Bunnings behold his hard work:

UK February 2016 268

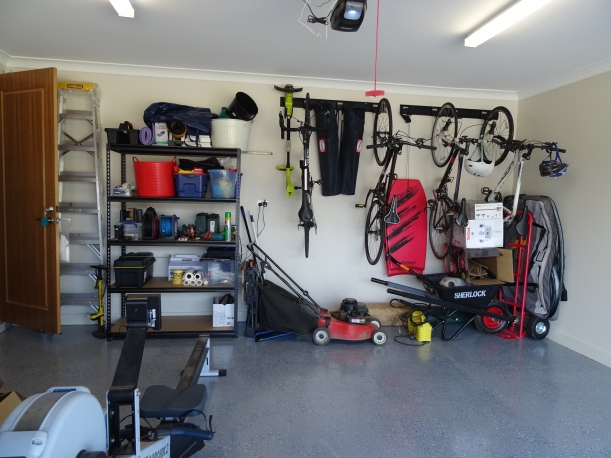
There is a bit more to do but my car does now fit in the garage. Shall we place bets as to when I reverse into the wheelbarrow or clip the bikes? I did notice that it is the boy’s bikes behind my car and his bike is safely to one side 🙂

What’s next?

The landscaping starts this week!!!

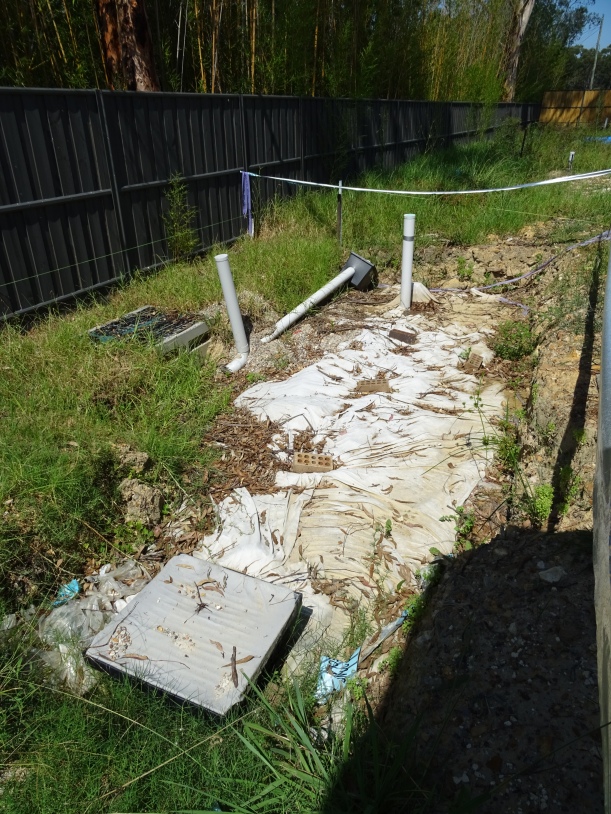
I am so looking forward to it starting and watching it take shape. I am keen to complete the rain garden once the retaining walls are in. The rain garden is looking rather sad at the moment but not for much longer.

UK February 2016 270

For planting inspiration I treated myself to a beautiful book called Birdscaping Australian Gardens

Trouble is I need a bigger garden for all the plants I like the look of 🙂


Leave a comment

Construction Timeline and landscaping

So here we are one month after handover and settling in nicely.

I have updated our Construction Timeline flowchart which you can find at the top of the page or follow this link:

Construction timeline

Tradies are beginning to come back to work and hopefully our outstanding items raised at PCI will be completed soon.

Our driveway has been completed today. We went for the same driveway as they had at the Ambassador show home at The Ponds, saw cut concrete spray painted with a textured colour plus fleck. The concrete driveway was poured and saw cut in December then left to cure. Today they spray painted two coats of charcoal then one coat of grey and one of white fleck and topped it all off with a couple of coats of sealant.

Looking pretty good if I say so myself.

Previously:

Driveway Collage

Today:

1st coat:

GR 21-01-16 007

2nd coat:

GR 21-01-16 010

2 coats of fleck – bit different to my sprinkles on the epoxy garage floor:

GR 21-01-16 016

Sealant:

GR 21-01-16 018

Ta da! Finished:

GR 21-01-16 022

Meanwhile our thoughts are turning to the landscaping. We want to crack on with this from both an aesthetic point of view and also to protect the slab from water pooling.

We went with a split level house following the slope of the land whilst our neighbours raised their slabs. This means that when it rains heavily the run off tends to pool around our slab as we are lower. We have had rather a lot of rain in the New Year and could see where it was pooling. I ended up nipping out and digging a trench to drain it away in between showers.

31-12-15 NYE Sydney 279

GR 21-01-16 011

Once the retaining walls and ag pipes are in plus some extra drainage it should no longer be a problem. Hubby has been out with fluoro string marking out different levels in the garden to give us an idea of what it will look like. The landscaping will be done in stages as we have decided to leave the pool until later when we have saved up a bit more to get what we would really like.

So first stages will be:

  1. Side retaining walls, fences and gates plus rear retaining wall.
  2. Raise rear garden then turf it plus finish rain garden.
  3. RHS flower beds & rear hedge planting.
  4. Add pebbles to side of driveway to ease parking (I’m finding it a little tricky parking – as long as I don’t end up in the swathe or knock down the front balcony pillar I’ll be right !)
  5. Fancy letterbox (moved far away from my manoeuvrings on the driveway  🙂 . I’m rather fond on our cheapo temporary one from Bunnings but its not the look I’m after).
  6. Turf front & side
  7. Reticulation

Second Stage:

  1. Pool and pavers
  2. Tier side garden with retaining wall and privacy screen artwork
  3. Create permanent drying area
  4. Plant front flower beds once access for pool is no longer required.

Third stage:

  1. Sit back and enjoy it all  🙂


6 Comments

Driveway & Rain Garden


Last week in the blistering heat they laid the driveway. The polar opposite from when the slab was laid when it poured with rain.

Tuesday late afternoon they did the formwork:


GR 24-11-15 008

GR 24-11-15 006

then on the Thursday in 39 degrees they poured the plain concrete.

GR 26-11-15 002

GR 26-11-15 003

Friday they saw cut it:

GR 01-12-15 PCI 005

GR 01-12-15 PCI 003

Then after at least 3 weeks curing time they spray on a fancy flecked coloured topcoat. As we are fast approaching the Christmas shutdown it will be the end of January before it is finished in all its glory.

We have chosen to have Wisdom Landscaping do our driveway and front path but will get our own landscaper to finish off the paths around the rest of the house. There will be an apron of paths and pool surround around most of the house to protect against slab heave. This follows recommendations by CSIRO in their sheet ‘Foundation Maintenance and Footing Performance: A Homeowner’s Guide’ which Wisdom handed out to us at some point in the proceedings.


GR 26-11-15 005

However did you spot that we are now fence free? After nearly seven months the house front is finally revealed  🙂

The missing balustrade is up now that the tile they cracked when originally fitting it has been replaced.

They had done a site tidy and scrape but the soil from the driveway excavation is now stockpiled to the left. The sand and gravel that has also appeared is the left over from the rain garden being rectified this week.

North Kellyville Rain Garden

For better or for worse we are required to have a rain garden. Unfortunately what was put in during the early stages of the build was not what was on the signed off Construction Plans. Wisdom agreed to correct it later in the build and it was finally done in the nick of time before PCI.

Original rain garden incorrectly sized and sited but seeing it in situ also highlighted the slope towards the bottom of the plot.:

NZ May 2015 299

We’d hoped not to have to have a retaining wall at the bottom of the garden. However if we don’t raise the level of the garden then the drop into the rain garden would be too dangerous. I had visions of children or the unwary disappearing over the edge!

So the retaining wall stays, the garden is raised and we have made the rain garden longer and narrower to try and stop it spreading towards the house so much. Once the walls are in we can use risers to put the rain garden Surge Pit and Outlet Pit at the required levels. The Surge Pit must be 150mm below the surface of the Outlet Pit and level with the finished surface of the rain garden. Then we just fill it up with the final layers, plant it and be done with it. Sorted! 🙂

I now know more about the ins and outs of rain gardens than I did at the beginning or ever wanted to. No doubt once our storm water system is up and running we’ll head towards a drought instead!

Here are a few pics of it being redone on a very hot day:

rain garden 1 Collage

Rain Garden 2 Collage

It looks huge at the moment but when the retaining walls are in, the batters up and the levels sorted it should end up not so in your face … I hope!

The QA team made a flying visit to the house this week apparently but did not manage to complete before our PCI on December 1st. More about that in my next post 🙂